Wednesday, 29 March 2017

Geek School: Writing Your First Full PowerShell Script

A few weeks ago, The Geek showed you how you can use the command prompt to find when your computer was started up last. In this last installation of Geek School for PowerShell, we are going to write a reusable PowerShell command to do the same thing.
Be sure to read the previous articles in the series:

Writing Your First Script

The first thing we need to do is find a way to access the information we looking for. Since we are dealing with management information, we probably need to take a look at using WMI, which does indeed have a class called Win32_OperatingSystem which allows you to view verbose information about your operating system, including the last time it started up.
image
So now that we know where we can find the information we looking for, open up the ISE and type the following.
Get-WmiObject -Class Win32_OperatingSystem –ComputerName localhost |
Select-Object -Property CSName,LastBootUpTime
Note: I had to split my code over two lines so that it all fit into the screenshot, but feel free to type it on a single line. If you do choose to split it over two lines, please make sure that the pipe character is the last character on line 1.
image
Now click on the green “Run Script” button or press the F5 key on your keyboard to test the code.
image
WMI times can be a little cryptic. By that we mean if you look at the LastBootUpTime property, it says 2013-03-19 at 18:26:21, but for some reason the WMI guys decided to concatenate all of that into a single string. Luckily for us, we don’t have to worry about manually parsing the string as there is an easier way to do it, albeit more advanced. You will need to change the Select-Object part of the code to look like this:
Select-Object -Property CSName,@{n=”Last Booted”;
e={[Management.ManagementDateTimeConverter]::ToDateTime($_.LastBootUpTime)}}
What we are doing here is creating a custom property called “Last Booted” and specifying that its value must be the result of calling the ToDateTime static method on the LastBootUpTime property of the current pipeline object. Your code should now look like this.
image
Running the code now will yield a much more readable last boot time.
image
Now that we are happy with the basic functionality of our script, we need to save it. For simplicity, let’s save it as the following:
C:\Get-LastBootTime.ps1
image
Now switch to the bottom half of the ISE and run the following:
C:\Get-LastBootTime.ps1
image
Great! Our script is working as expected, however there is still one problem with our script. We hardcoded the name of the computer we want to get the last boot time for. Instead of hardcoding values, we should rather provide a parameter so that whoever is using the script can choose which computer they run the script against. To do that, go to the top of your script and do the following.
param(
[string]$ComputerName
)
Then replace the hardcoded localhost value with $ComputerName variable. Your script should now look like this:
image
Save your script, then head back to the bottom half of the ISE and view the help for your script.
help C:\Get-LastBootTime.ps1
image
Awesome, so now we can specify the name of the computer we want to get the last boot time for using our new ComputerName parameter. Unfortunately, there are still a few things wrong. Firstly, the ComputerName parameter is optional and secondly, that’s the ugliest helpful I’ve ever seen, so let’s fix those issues quickly. To make the ComputerName parameter mandatory, change the contents of the param block to the following.
[Parameter(Mandatory=$true)][string]$ComputerName
As for making a better help file, the most common method is to use comment based help. That means we just add an extra long comment to the top of out script.
<#
.SYNOPSIS
Shows when last your PC started up.
.DESCRIPTION
This is a WMI wrapper function to get the time that your PC last started up.
.PARAMETER ComputerName
The name of the Computer you want to run the command against.
.EXAMPLE
Get-LastBootTime -ComputerName localhost
.LINK
www.howtogeek.com
#>
Once all that is done, you should end up with a script looking like this.
image
Let’s now go and check out our new help file.
image
Ahhh, looking great! Now that our script is complete, we have one last thing to do: testing. For this, I’m going to exit out of the ISE and head back into the PowerShell console just so that we can make sure that there are no anomalies.
image
If you start with a simple one liner and just keep building onto it like we did in this guide, you will get the hang of it in no time. That’s all for this time folks, see you in the next installation of Geek School.

Three PowerShell queries to obtain critical system information

There is nothing worse than being given a system requirement and not knowing whether it can be applied to a number of systems. There are countless examples, such as free space on local computers or what levels of JAVA or .NET framework are installed. Sometimes, we may be given more difficult requirements that we may or may not be able to easily determine.
Here are three scripts you can use to get detailed information for specific questions about Windows clients and servers. The scripts are based on PowerShell 2, which can be applied to Windows XP and higher on the client side as well as on Windows Server 2003 and higher on the server editions. For PowerShell 2, it is recommended that you install the Windows PowerShell PowerPack.
Note: This article is also available as a PDF download.

#1: Determine primary screen resolution

When a software package requires a certain resolution or minimum resolution, you can query the local computer to return the resolution of the primary monitor. Multiple monitors are not reported in this command. The code to perform this task is the simple one-liner Get-DisplaySetting, shown in Figure A.

Figure A


This PowerPack command does not (currently) support execution against a remote computer, which is the biggest limitation to its usage for a broad-reaching inventory. In this case, you could couple the installation of the PowerPack with a Group Policy software installation package and run it locally to report the results for a number of systems. Couple the command with a variable to determine the computer's name and export it to a local (or central file):
$NetBIOSName = gc env:computername
Get-DisplaySetting > C:\$NetBIOSName.txt

#2: Enumerate USB devices

Determining what USB devices are in use on a system can be tough. Administrators bemoan the day that PC makers replaced PS/2 interfaces for keyboard and mice with USB ports. This is simply because it is easier to make a generic USB device policy, and PS/2 input devices would function fine outside that policy. The Get-USB PowerShell module will enumerate the devices currently attached to the USB interfaces of a server or workstation. A sample output is shown in Figure B.

Figure B


In this example, the caption section has the string "Blue Snowball" listed as the connected USB device. This is a microphone, and for organizations wanting to restrict the device types for systems, this can inventory what USB devices are attached to the system. Likewise, if a USB Mass Storage device is enumerated in the list, this can roll into the auditing of a policy that may or may not be enforced.
Unlike the previous command, you can run this command against remote systems natively. Running the command with the -computername variable will connect the command to a remote system and return the same results as if it were executing locally. This doesn't require PowerShell PowerPack to be installed when executing remotely, which is handy. The command would execute as shown below:
Get-USB -Computername System.FullyQualified.Domain

#3: Retrieve detailed processor information

The current inventory of processors for servers, workstations, and virtual machines can be mind-boggling. The Get-Processor PowerShell command can help centralize this information for quick information on how many cores or CPUs are available to a system. The Get-Processor command is shown in Figure C.

Figure C


In this example, you can see how the virtual machine in this case is provisioned with one CPU with core including the model and frequency. If the -Computer parameter is omitted; it will return the local results. Different processor configurations will return different values and information comparable to old-school tools like CPUID.

Tools for the arsenal

These PowerShell scripts are a key way for administrators to gather succinct information about the computing environment. What other PowerShell tools have you used for inventory functions? Share your comments below.

10 PowerShell commands every Windows admin should know

1: Get-Help

The first PowerShell cmdlet every administrator should learn is Get-Help. You can use this command to get help with any other command. For example, if you want to know how the Get-Process command works, you can type:
Get-Help -Name Get-Process
and Windows will display the full command syntax.
You can also use Get-Help with individual nouns and verbs. For example, to find out all the commands you can use with the Get verb, type:
Get-Help -Name Get-*

2: Set-ExecutionPolicy

Although you can create and execute PowerShell scripts, Microsoft has disabled scripting by default in an effort to prevent malicious code from executing in a PowerShell environment. You can use the Set-ExecutionPolicy command to control the level of security surrounding PowerShell scripts. Four levels of security are available to you:
  • Restricted — Restricted is the default execution policy and locks PowerShell down so that commands can be entered only interactively. PowerShell scripts are not allowed to run.
  • All Signed — If the execution policy is set to All Signed then scripts will be allowed to run, but only if they are signed by a trusted publisher.
  • Remote Signed — If the execution policy is set to Remote Signed, any PowerShell scripts that have been locally created will be allowed to run. Scripts created remotely are allowed to run only if they are signed by a trusted publisher.
  • Unrestricted — As the name implies, Unrestricted removes all restrictions from the execution policy.
You can set an execution policy by entering the Set-ExecutionPolicy command followed by the name of the policy. For example, if you wanted to allow scripts to run in an unrestricted manner you could type:
Set-ExecutionPolicy Unrestricted

3: Get-ExecutionPolicy

If you're working on an unfamiliar server, you'll need to know what execution policy is in use before you attempt to run a script. You can find out by using the Get-ExecutionPolicy command.

4: Get-Service

The Get-Service command provides a list of all of the services that are installed on the system. If you are interested in a specific service you can append the -Name switch and the name of the service (wildcards are permitted) When you do, Windows will show you the service's state.

5: ConvertTo-HTML

PowerShell can provide a wealth of information about the system, but sometimes you need to do more than just view the information onscreen. Sometimes, it's helpful to create a report you can send to someone. One way of accomplishing this is by using the ConvertTo-HTML command.
To use this command, simply pipe the output from another command into the ConvertTo-HTML command. You will have to use the -Property switch to control which output properties are included in the HTML file and you will have to provide a filename.
To see how this command might be used, think back to the previous section, where we typed Get-Service to create a list of every service that's installed on the system. Now imagine that you want to create an HTML report that lists the name of each service along with its status (regardless of whether the service is running). To do so, you could use the following command:
Get-Service | ConvertTo-HTML -Property Name, Status > C:\services.htm

6: Export-CSV

Just as you can create an HTML report based on PowerShell data, you can also export data from PowerShell into a CSV file that you can open using Microsoft Excel. The syntax is similar to that of converting a command's output to HTML. At a minimum, you must provide an output filename. For example, to export the list of system services to a CSV file, you could use the following command:
Get-Service | Export-CSV c:\service.csv

7: Select-Object

If you tried using the command above, you know that there were numerous properties included in the CSV file. It's often helpful to narrow things down by including only the properties you are really interested in. This is where the Select-Object command comes into play. The Select-Object command allows you to specify specific properties for inclusion. For example, to create a CSV file containing the name of each system service and its status, you could use the following command:
Get-Service | Select-Object Name, Status | Export-CSV c:\service.csv

8: Get-EventLog

You can actually use PowerShell to parse your computer's event logs. There are several parameters available, but you can try out the command by simply providing the -Log switch followed by the name of the log file. For example, to see the Application log, you could use the following command:
Get-EventLog -Log "Application"
Of course, you would rarely use this command in the real world. You're more likely to use other commands to filter the output and dump it to a CSV or an HTML file.

9: Get-Process

Just as you can use the Get-Service command to display a list of all of the system services, you can use the Get-Process command to display a list of all of the processes that are currently running on the system.

10: Stop-Process

Sometimes, a process will freeze up. When this happens, you can use the Get-Process command to get the name or the process ID for the process that has stopped responding. You can then terminate the process by using the Stop-Process command. You can terminate a process based on its name or on its process ID. For example, you could terminate Notepad by using one of the following commands:
Stop-Process -Name notepad

Stop-Process -ID 2668
Keep in mind that the process ID may change from session to session.

How to create an Azure VM with PowerShell

Step #1: Connect to your Azure subscription ^

The first thing we need to do is sign in to Azure:
You’ll have to provide your Azure credentials.


Next, you have to create a storage account because the VM image will be stored in Azure Storage:
Note that the storage account name must be unique in Azure. If you receive an error message that the name is already taken, you have to repeat the command with another storage account name. An overview of the available locations can be found here.
Next, I use Set-AzureSubscription to set the new storage account as the current storage account for my Azure subscription. You can get the name of your subscription with Get-AzureSubscription; in the example below, mine is '150dollar':

Step #2: Find your desired OS image ^

We now programmatically access the Azure operating system (OS) image gallery to get the "latest and greatest" Windows Server 2012 R2 image.
The following Get-AzureVMImage pipeline retrieves the most recent image name, however honkin' long it is. Once you have it, select it and copy it to your clipboard, because we'll need it in the next step.
I want you to improve your PowerShell skills; so many Windows systems administrators I know can copy and paste PowerShell code all day long, but few understand what the code does. Let me break down the previous pipeline, piece by piece:
  • First, we retrieve all Azure VM images from the Microsoft gallery.
  • Second, we extract three key properties from the original dataset (which is very large).
  • Third, we filter to retrieve only images that start with 'Windows Server 2012 R2'.
  • Fourth, we perform a descending sort on publication date. (Remember that our goal is to get the most recent image.)
  • Fifth, we run Select-Object to reduce our results only to the most recent OS image.
  • Sixth and finally, we put the view in list format for easier browsing.

Step #3: Create your VM configuration ^

We need to create a VM configuration before we use New-AzureVM to create the virtual machine.
I'm a fan of storing settings in variables and then passing the variables into cmd-lets as parameter values.
Of course, I'm not going to leave you hanging in the breeze, throwing code at you without explanation. Let me briefly explain those three variables:
  • $image: This variable stores the OS image name we found in a previous step. Note that the image name changes from time to time.
  • $vmname: This is the DNS hostname of our new VM.
  • $vmsize: This is the VM instance size. Be careful that you're choosing a size that is (a) correct for the VM you're deploying and (b) consistent with your spending budget.
Now we'll use New-AzureVMConfig to create a VM configuration and store the object in the $vm1 variable:
We can use Get-Credential and Add-AzureProvisioningConfig to safely capture a username and password and attach them to our new VM's administrative account. They will be the credentials that you need to sign in to the Windows server.

Notice that we pipe our $vm1 object into Add-AzureProvisioningConfig; that's a convenient tip for adding functionality to an object that's already resident in your PowerShell session's memory.

Step #4: Create the VM ^

First, we have to create a new cloud service, which provides a container for our server and assigns a unique public DNS name and IP to the server. The public DNS name consists of the service name plus coudapp.net. In our example, the DNS name would be 'west150service.coudapp.net'. Thus, the service name has to be unique in Azure.
We then use the service name to create the VM with the New-AzureVM cmdlet:
We have to ensure here that cloud service is in the same Azure region as our storage account. I like to use the –WaitForBoot switch parameter, because it will fail VM creation if the VM doesn't reach ReadyRole (provisioned and ready for launch) status.
We can then invoke Get-AzureVM to verify the state of our new VM:
It's possible to create the Remote Desktop Connection (.RDP) connection files programmatically. However, at this point, it's probably easier for you to log into the Azure Management Portal, select your virtual machine, and click Connect, as shown in the following screenshot:
Creating our connection .RDP file
As you can see in the following screen capture, my DC1 virtual machine is up and running!
Our Azure cloud-based VM
A final note: If you're just testing, please make sure not only to stop but to deallocate your virtual machine, to ensure that you don't get charged by Microsoft for reserving computational power for your "simply powered off" VM. Sneaky, eh?
You shut down and deallocate your VM by running Stop-AzureVM with the –Force switch.
In the next example, I'm using Where-Object to stop and deallocate all my running VMs:
Your VM status will change to StoppedDeallocated once you've successfully run the previous command.
In the next articles of this series, we will show you how you can create an Azure VM via the Azure Resource Manager (ARM).

Using PowerShell to monitor your Azure Machine


In this new chapter, I will show you how to get information about your VM machine already created. We will use PowerShell cmdlet commands to retrieve the information.

Requirements

I am assuming that you already have a VM in Azure installed.
  • An Azure subscription.
  • A VM Machine in Azure with SQL Server already installed (check my article about Azure VMs).
  • A local machine with Windows installed with PowerShell.

Getting started

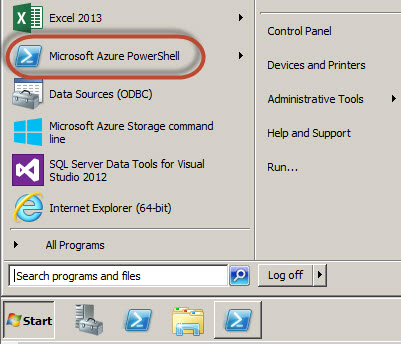
  1. In order to start, in the local machine open the Microsoft Azure PowerShell:
    Get-AzureVM

    Figure 1. Starting the Microsoft Azure PowerShell
  2. Let’s start with a simple command. The Get-AzureVM:

    Figure 2. The Get-AzureVM cmdlet.
  3. By default, it shows the active VMs, the name and status of Azure VMs. You can verify in the Azure Portal the VM names:

    Figure 3. The virtual machines in the Azure Portal
  4. Alternatively, you can run this command to get more information about the VM in Azure:
    Get-AzureVM | select hostname,instancesize,IpAddress,NetworkInterfaces,OperationStatus, PowerSate, ServiceName,Status
    Figure 4. The Get-AzureVM cmdlet
  5. The command shows the InstanceSize, the IP Address, The OperationStatus. The PowerState, ServiceName, Status.
    The instance size is related to a specific price. You can find more information about prices and instance sized here.
    The PowerState and OperationsStatus are very important to check if the VM is OK.
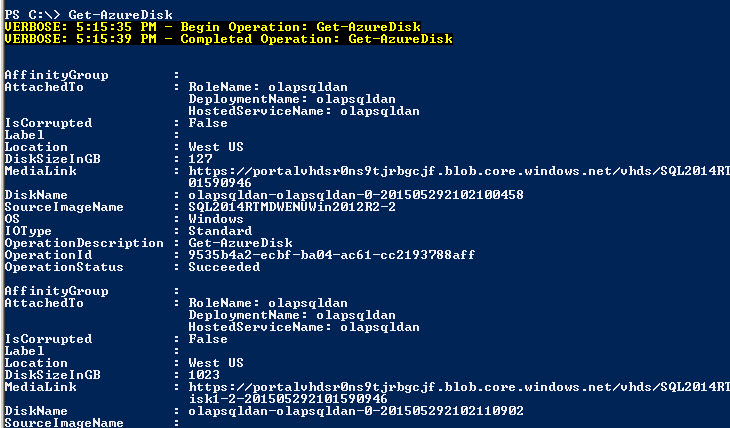
  6. Another useful cmdlet is the Get-AzureDisk:

    Figure 5. The Get-AzureDisk cmdlet
  7. The Get-AzureDisks shows all the disks, the status of them, their location, DiskSize, name and other useful information about the disk:

    Figure 6. The Azure Disk results.
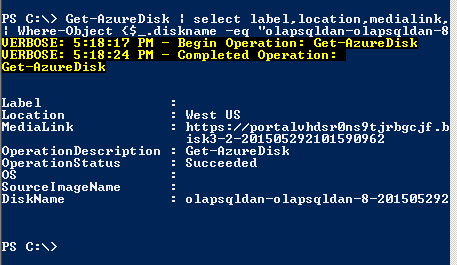
  8. By default, it shows all the disks, but you can specify the information that you want to check and specify the name of the disk:
    Get-AzureDisk | select label,location,medialink,operationdescription,operationstatus,OS,sourceimagename,diskname| Where-Object {$_.disknameeq "olapsqldan-olapsqldan-8-201505292102250296"}

    Figure 7. Custom query about the disk information

    The command shows the Disk information of the disk whose name is olapsqldan-olapsqldan-8-201505292102250296.
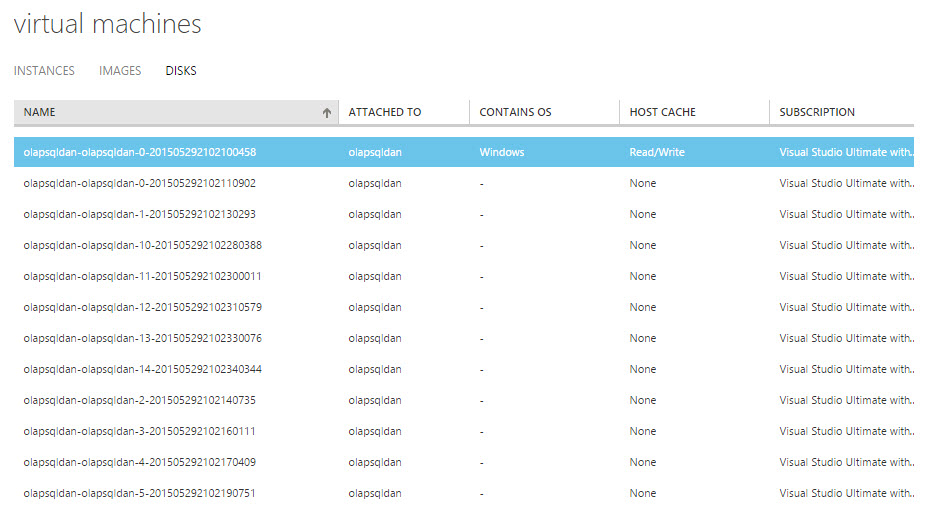
  9. You can verify in the Azure Portal the disk information and compare with the PowerShell results:

    Figure 8. The Azure VM disks
  10. Another common command is the Get-AZureVMExtension. You can configure and extend the VM capabilities in Azure using the VM extensions.
    Get-AzureVMServiceName "olapsqldan" -Name "olapsqldan" | Get-AzureVMExtension

    Figure 9. The Get-AzureVM cmdlet

    You can extend the security features, to support Windows System Center, to automate tasks, display and administer your VM, etc.
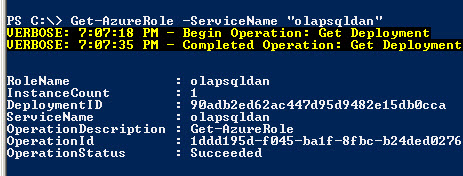
  11. You can also get the Roles of a specific Azure Service. The following example shows the roles of the Service olapsqldan:
    Get-AzureRoleServiceName "olapsqldan"
  12. The results shows the Role name, deployment ID, Operation status, etc.

    Figure 10. The Get-AzureRole cmdlet
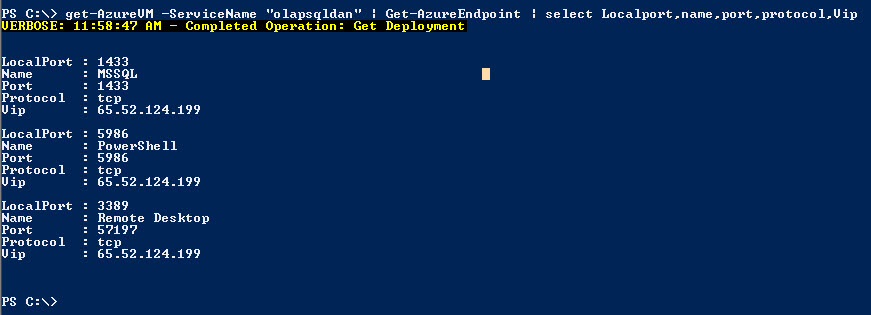
  13. The EndPoint information is also useful. You can verify the ports used and enabled, the Vip used and protocols. The following cmd shows the EndPoints of the Service olpasqldan:
    get-AzureVMServiceNameolapsqldan” | Get-AzureEndpoint | select Localport,name,port,protocol,Vip

    Figure 11. The Get-AzureEndpoint cmdlet
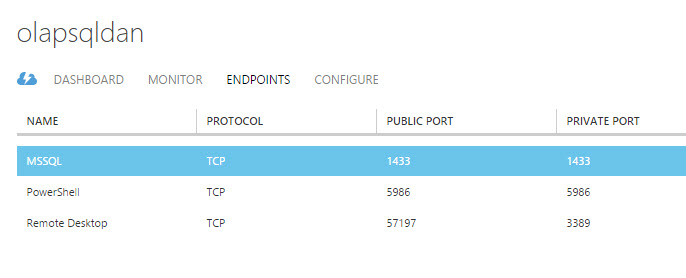
  14. You can verify and compare the information of the PowerShell with the Azure Portal:

    Figure 12. The list of endpoints.
  15. Another important command is the Get-AzureLocation. This cmdlet shows all the locations available where you can store your VM:
    Get-AzureLocation | select DisplayName, virtualmachinerolesizes, storageaccounttypes

    Figure 13. The Get-AzureLocation cmdlet

    The command shows the different locations available like US West, East, Japan East, West, the Machine Sizes (explained in step 5), etc.
    The next cmdlet is the Get-AzureOSDisk. The command lets you check the OS where the disk is, the disk name with the OS, the media link.
    Get-AzureVMServiceNameolapsqldan” | Get-AzureOSDisk

    Figure 14. The Get-AzureOSDisk command
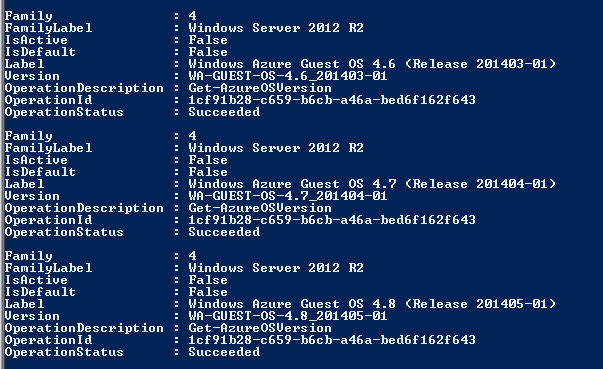
  16. Another useful cmdlet is the Get-AzureOSVersion. It shows all the OSs available in Azure.
    Get-AzureOSVersion

    Figure 15. The Get-AzureOSVersion cmdlet
  17. Now, let’s create some queries to retrieve more specific information. For example, to get the list of OSs version 2008, you can use the following query:
    Get-AzureOSVersion | select FamilyLabel | Where-Object {$_.FamilyLabel -like "*2008*"}
  18. You can export your results to a csv file to open the results in an Excel file. The following sample exports the results of a PowerShell query in a file name export.csv:
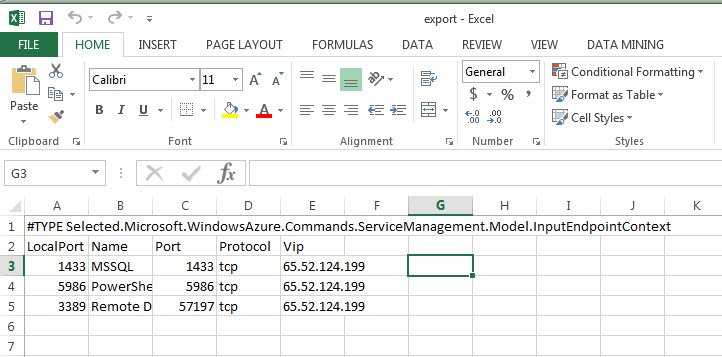
    get-AzureVMServiceNameolapsqldan” | Get-AzureEndpoint | select Localport,name,port,protocol,Vip| Export-Csv c:\scripts\export.csv
  19. If everything is OK, you will be able to open and check the Endpoints information in Excel:

    Figure 16. The PowerShell results in MS Excel
  20. Let’s check if the port 1433 is used by the EndPoints. You can use the following PowerShell Command:
    get-AzureVMServiceNameolapsqldan” | Get-AzureEndpoint | select Localport,name,port,protocol | Where-Object {$_.LocalPorteq "1433"}
  21. You will have a result similar to this one:

    Figure 17. Verifying port used in EndPoints.
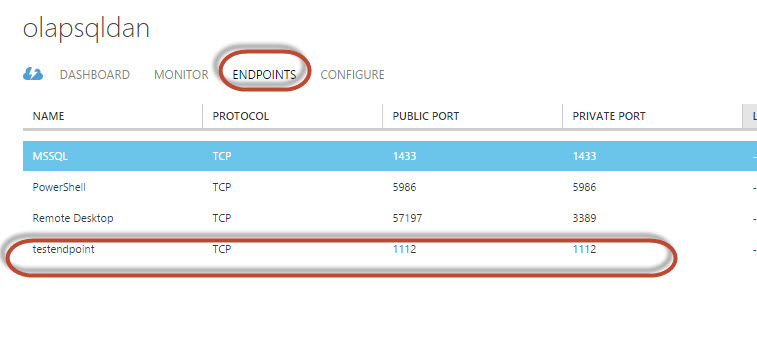
  22. The following example will create an EndPoint named testendpoint in the Virtual Machine olapsqldan with the port 1112 and the protocol TCP-IP:
    Get-AzureVMServiceName "olapsqldan" | Add-AzureEndpoint -Name "testendpoint" -Protocol "tcp" –PublicPort 1112 –LocalPort 1112 | Update-AzureVM
  23. The result displayed is the following:

    Figure 18. The results of the EndPoint Creaton with PowerShell
  24. If everything is OK, you will be able to see the EndPoint in the VM section in the EndPoint Tab:

    Figure 19. The EndPoint created in the Azure Portal
  25. Now, let’s say that I do not want the port 1112 to be enabled. Lets say that I want to erase the endpoint automatically if it uses this port. To do that, we need to store the EndPoint information in a variable named Object using the following commands:
    $Object=get-AzureVMServiceNameolapsqldan” | Get-AzureEndpoint | select Localport,name,port,protocol | Where-Object {$_.LocalPorteq "1112"}
  26. The result displayed will be similar to this one:

    Figure 20. The results of a query stored in a PowerShell variable
  27. To retrieve the value of a property. In this case the Port number, we can use the following command:
    $Object.port
  28. The result displayed will be the following:

    Figure 21. The variable properties
  29. Now, if we want to automatically erase an EndPoint according if a specified port is used, we can use this script:
    $Object=get-AzureVMServiceNameolapsqldan” | Get-AzureEndpoint | select Localport,name,port,protocol | Where-Object {$_.LocalPorteq
    "1112"}
    If($Object.porteq "1112")
    {
    Get-AzureVMServiceName "olapsqldan" | Remove-AzureEndpoint –Name "testendpoint" | Update-AzureVM
    }
  30. The scripts verify if the port 1112 is used. If that is the case, the EndPoint is removed. In order to run a script save the commands of the step 29 in a script named powershell.ps1
  31. Once saved, navigate to the path where the script is stored.
    Cd c:\scripts
  32. You can finally execute the file
    .\powershell.ps1
  33. You will receive a message similar to this one. The succeeded operation should be displayed.

    Figure 22. The PowerShell script executed
  34. You can verify the results using the Azure Portal and verify that the EndPoint created on step 24, was removed by the PowerShell Script.
PowerShell is a very powerful tool to monitor and verify information from your VM or VMs. In this chapter, we learned how to retrieve information about this tool related to IPs, VM, Services, Roles, Endpoints, Ports, etc.

The best ways to connect to the server using Angular CLI

Everybody who has used  Angular CLI  knows that it is a powerful tool which can take a front-end development job to a completely dif...